How to Paint with Limewash
Limewash Paint Application Methods and Tips

James Alexander Limewash Paints can be used for a variety of decorative wall finishes. Our standard application is the most common and provides a nearly opaque finish with subtle variation and texture. The methods and tips on this page are aimed to provide a straightforward introduction guide to the application of our limewash paint products.
Introduction
With lime mineral paint, always paint on an absorbent mineral surface such as exposed masonry, or apply our Lime-Prep Primer to create a micro absorbent surface. This step will allow your paint to "stick" and develop its proper color to common wall materials such as gypsum board.
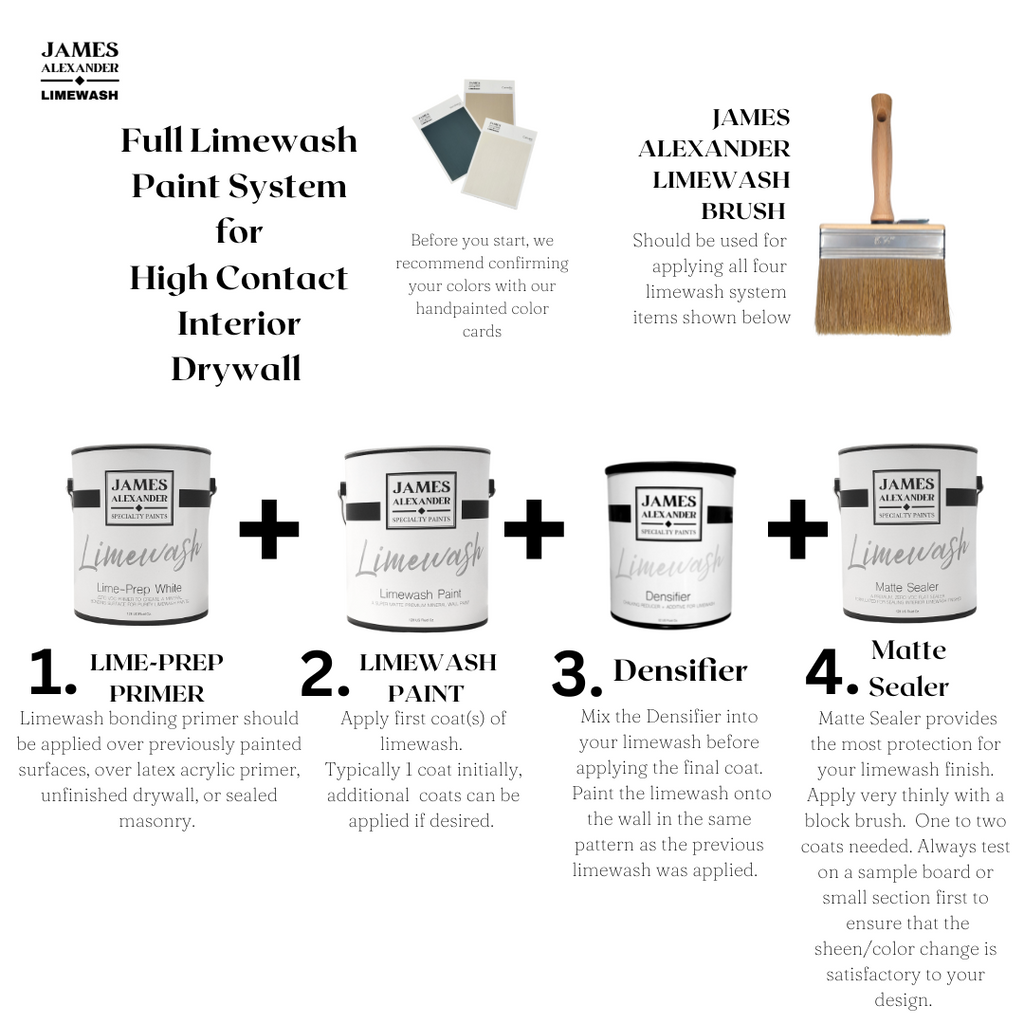
James Alexander Limewash Paints are best applied with a large block style brush that can hold a good quantity of material. The James Alexander Limewash Brush is a blend of bristle types which provides ideal workability for our paints.
There are multiple ways to finish limewash for specific distinctive lime paint looks.

Standard and Opaque Finishes
The standard wall application method is to apply 2 to 3 coats of James Alexander Limewash Paint over a coat of Lime-Prep Primer. This will create the typical soft and lightly textural limewash wall finish. On the final coat, the mix-in densifier will be used if you are using the paint in an area where the wall will be touched to reduce the chalky finish. Our Limewash Sealer can be applied over limewash with or without the Densifier additive, but is easier to apply over the densified finish.
Our lime paint is a thinner consistency than latex paint and coats will typically apply faster and spread further. It is important to spread the paint as far as it will naturally go and not attempt to apply in a thick coating to attempt to build up the paint. Additional thin coats will provide a better finish than trying to apply in thick coats.
Standard wall application:
- For the first coat, apply at full strength and spread each amount applied as far as it will go. It should not be perfect and you should try not to over-brush. Generally, limewash is applied in the four following general brushstroke patterns: crosshatch, random, vertical, or horizontal. Each will create a bit of a different effect as limewash paint will show some of the effect of the brushstroke pattern as the material dries. It's a great idea to experiment with different brushstroke patterns on a sample sheet of gypsum board to determine which look you like best. There are no rules to brush pattern and method. You are the artist, be expressive! Each person paints limewash paint slightly differently.
- After the first coat is dry and beginning to cure (overnight is best, but not required), apply a second coat. The second layer typically will use more limewash paint than the first layer, even as you spread the paint thinly over the surface. This is due to increased absorption into the initial layer of lime paint. The second layer typically provides a much more opaque finish layer. A third application can be applied for an even more dense finish. Each application of lime paint should be applied thinly and without over-brushing.
Semi Transparent & Tone-on-Tone Limewash Finishes
One or two applications of various dilution ratios will create a semi-transparent finish. James Alexander Limewash Paint can be diluted with water up to 300 percent of volume to create a nearly transparent wash effect. This is a standard dilution ratio for wood-wash finishes. "Tone on tone" is the effect of starting with a base coat (usually two applications) of a generally deeper color and painting a water-thinned coat of a lighter color as a third coat. This creates a higher contrast and greater depth-of-finish. A common way to create the lighter tone is to add 25% white (Bianca color) to your base color and 10%-20% water. The base color is painted with a third coat of this lighter version of the color to create the effect.
Distressed Limewash Finishes
Applications of lime paint that are sprayed with water and/or wiped off with a cloth or scrubbing pad, or plastic bristle brush as the material is just dry/setting will create a distressed or aged finish.
Layering Techniques
Applications of slightly differently tinted lime paints using various layering techniques can create mottled and unique finishes. We find the best results usually start with a darker shade and overlay with a lighter shade. Similar colors often work well together and contrasting colors can create a high-contrast effect.
Creating Custom Colors
While we do not offer custom color matching, mixing two or more colors can create a custom blend and all James Alexander Limewash colors are compatible for blending together to create custom colors.
Tips and Application Essentials
There are some specific methods that we find essential to produce the best results. For those of you who are familiar with staining wood, many of the same principals apply
1. Make sure that if your surface to paint isn't naturally absorbent (unfinished/non-sealed masonry, wood, concrete, or plaster), that you do apply Lime-Prep Primer before painting with lime paint. Please note that some bare wood surfaces can be damaged by direct application of lime paint without first applying a sealer to the wood. Contact customer support if you have questions about proper prep or apply to a test area to determine suitability.
2. James Alexander Lime Paint must be brushed for best results. Lime paint will apply faster with a brush than other paint, as it is a thin material compared to acrylic paints.
3. Apply in very thin layers (usually 2-3) with a block style brush and review as you go to make sure to clean up any "drips/runs" as you go on the wall surface. Only after it dries will you be able to see the build and color (it will appear much darker and more transparent when wet).
4. Maintain a "wet edge" and paint from one side of the surface to the other. Another method is the cloud technique and involves painting random "clouds" of lime paint and then blending the clouds into each other. Maintaining a wet edge is still required with the cloud method. The entire wall must be painted once started or there will be a darker layering appearance at the stopping/starting point. The wall can be lightly misted with water at your edge to preserve the wet edge for longer working times.
5. Do not "cut-in" lime paint like a traditional paint as this will create undesirable layering effect. In other words, don't paint lines around the edges of the wall or around windows - and then paint in the main body of the wall at a later time.
6. Wait 24 hours between applications for most consistent results. If you want to coat with another layer sooner, you can do this once dry but it may lift some of the previous coat into your current application (reducing the thickness of the coating). We recommend lightly misting/spraying the surface immediately before applying the second coat and subsequent coats. This will allow the lime paint to spread properly over the prior coat. You can lightly mist the wall to dampen it after applying the second or final coat. This can help the curing of the material and may also increase color variation in the wall if that is a desired effect. Do not wet wall to the point where water can run down the surface as this will cause water streaking.
7. If you decide to seal to create a wipeable surface, wait at least 48 hours after final application to apply James Alexander Limewash Sealer. For best results wait to seal until after 1 week of curing.
8. Make sure to use interior sealer for interior applications only.


Closing advise on preparation for your project
We recommend practicing different methods on sample boards to create a look that is suitable for the desired outcome. often, a 2'x2' plywood or drywall board is readily available at local building and home improvement stores. These sample boards allow you to try different techniques and fine tune your application methods before starting the project! It's nice to feel more comfortable with your application approach and finish expectations before starting on the wall. Always wear protective gloves, clothing, and eye protection. And don't forget to have fun creating your beautiful lime paint finish!
